Home › Forums › Help and Support › 1D LUT for ReShade
- This topic has 6 replies, 2 voices, and was last updated 9 years, 8 months ago by
 Pneumatic.
-
AuthorPosts
-
2016-09-08 at 16:33 #3996
Hello
I would like to make a simple 1D gamma correction LUT with a custom white point, and use it in ReShade. Is it possible?
The reason I do not want to make a full 3D LUT is because my colourimeter is not accurate enough for it (i1d2) and it ends up looking worse.
I have found that the best result from the i1d2 comes if I pick a custom white point that looks neutral to my eyes, and then calibrate a 1D LUT to that white point.
Thank you!
2016-09-08 at 21:17 #3999Hi,
I would like to make a simple 1D gamma correction LUT with a custom white point, and use it in ReShade. Is it possible?
With a small roundtrip to the command line, yes.
- If you do not already have a calibration, calibrate & profile in DisplayCAL like you’d normally do (do not use ReShade preset).
- Download the following linear 1D LUT: CFX_lut_linear_0-255.tif
- Open a command prompt.
- Run
C:\Users\Your_Username\Downloads\Argyll_V1.8.3\bin\cctiff C:\Users\Your_Username\AppData\Roaming\DisplayCAL\storage\Name_of_profile\Name_of_profile.cal C:\Users\Your_Username\Downloads\CFX_lut_linear_0-255.tif C:\Users\Your_Username\Downloads\CFX_lut.tif(adjust paths as necessary). This will apply the calibration to the linear 1D LUT and save it as CFX_lut.tif - Save CFX_lut.tif as PNG to the ReShade\CustomFX\textures folder, overwriting the existing file. You can use MS Paint for this.
- Enable “LUT – CustomFX” under “Pipeline” in the Mediator.
2016-09-09 at 2:40 #4001Thank you so much!
2016-09-11 at 16:45 #4040Sadly the shader does not use dithering and there is lots of banding 🙁
In fact the banding is much worse than at the desktop! (Nvidia GPU).
It can be mitigated back to regular levels of banding by using the -p option with cctiff (generates the .tiff with extra precision).
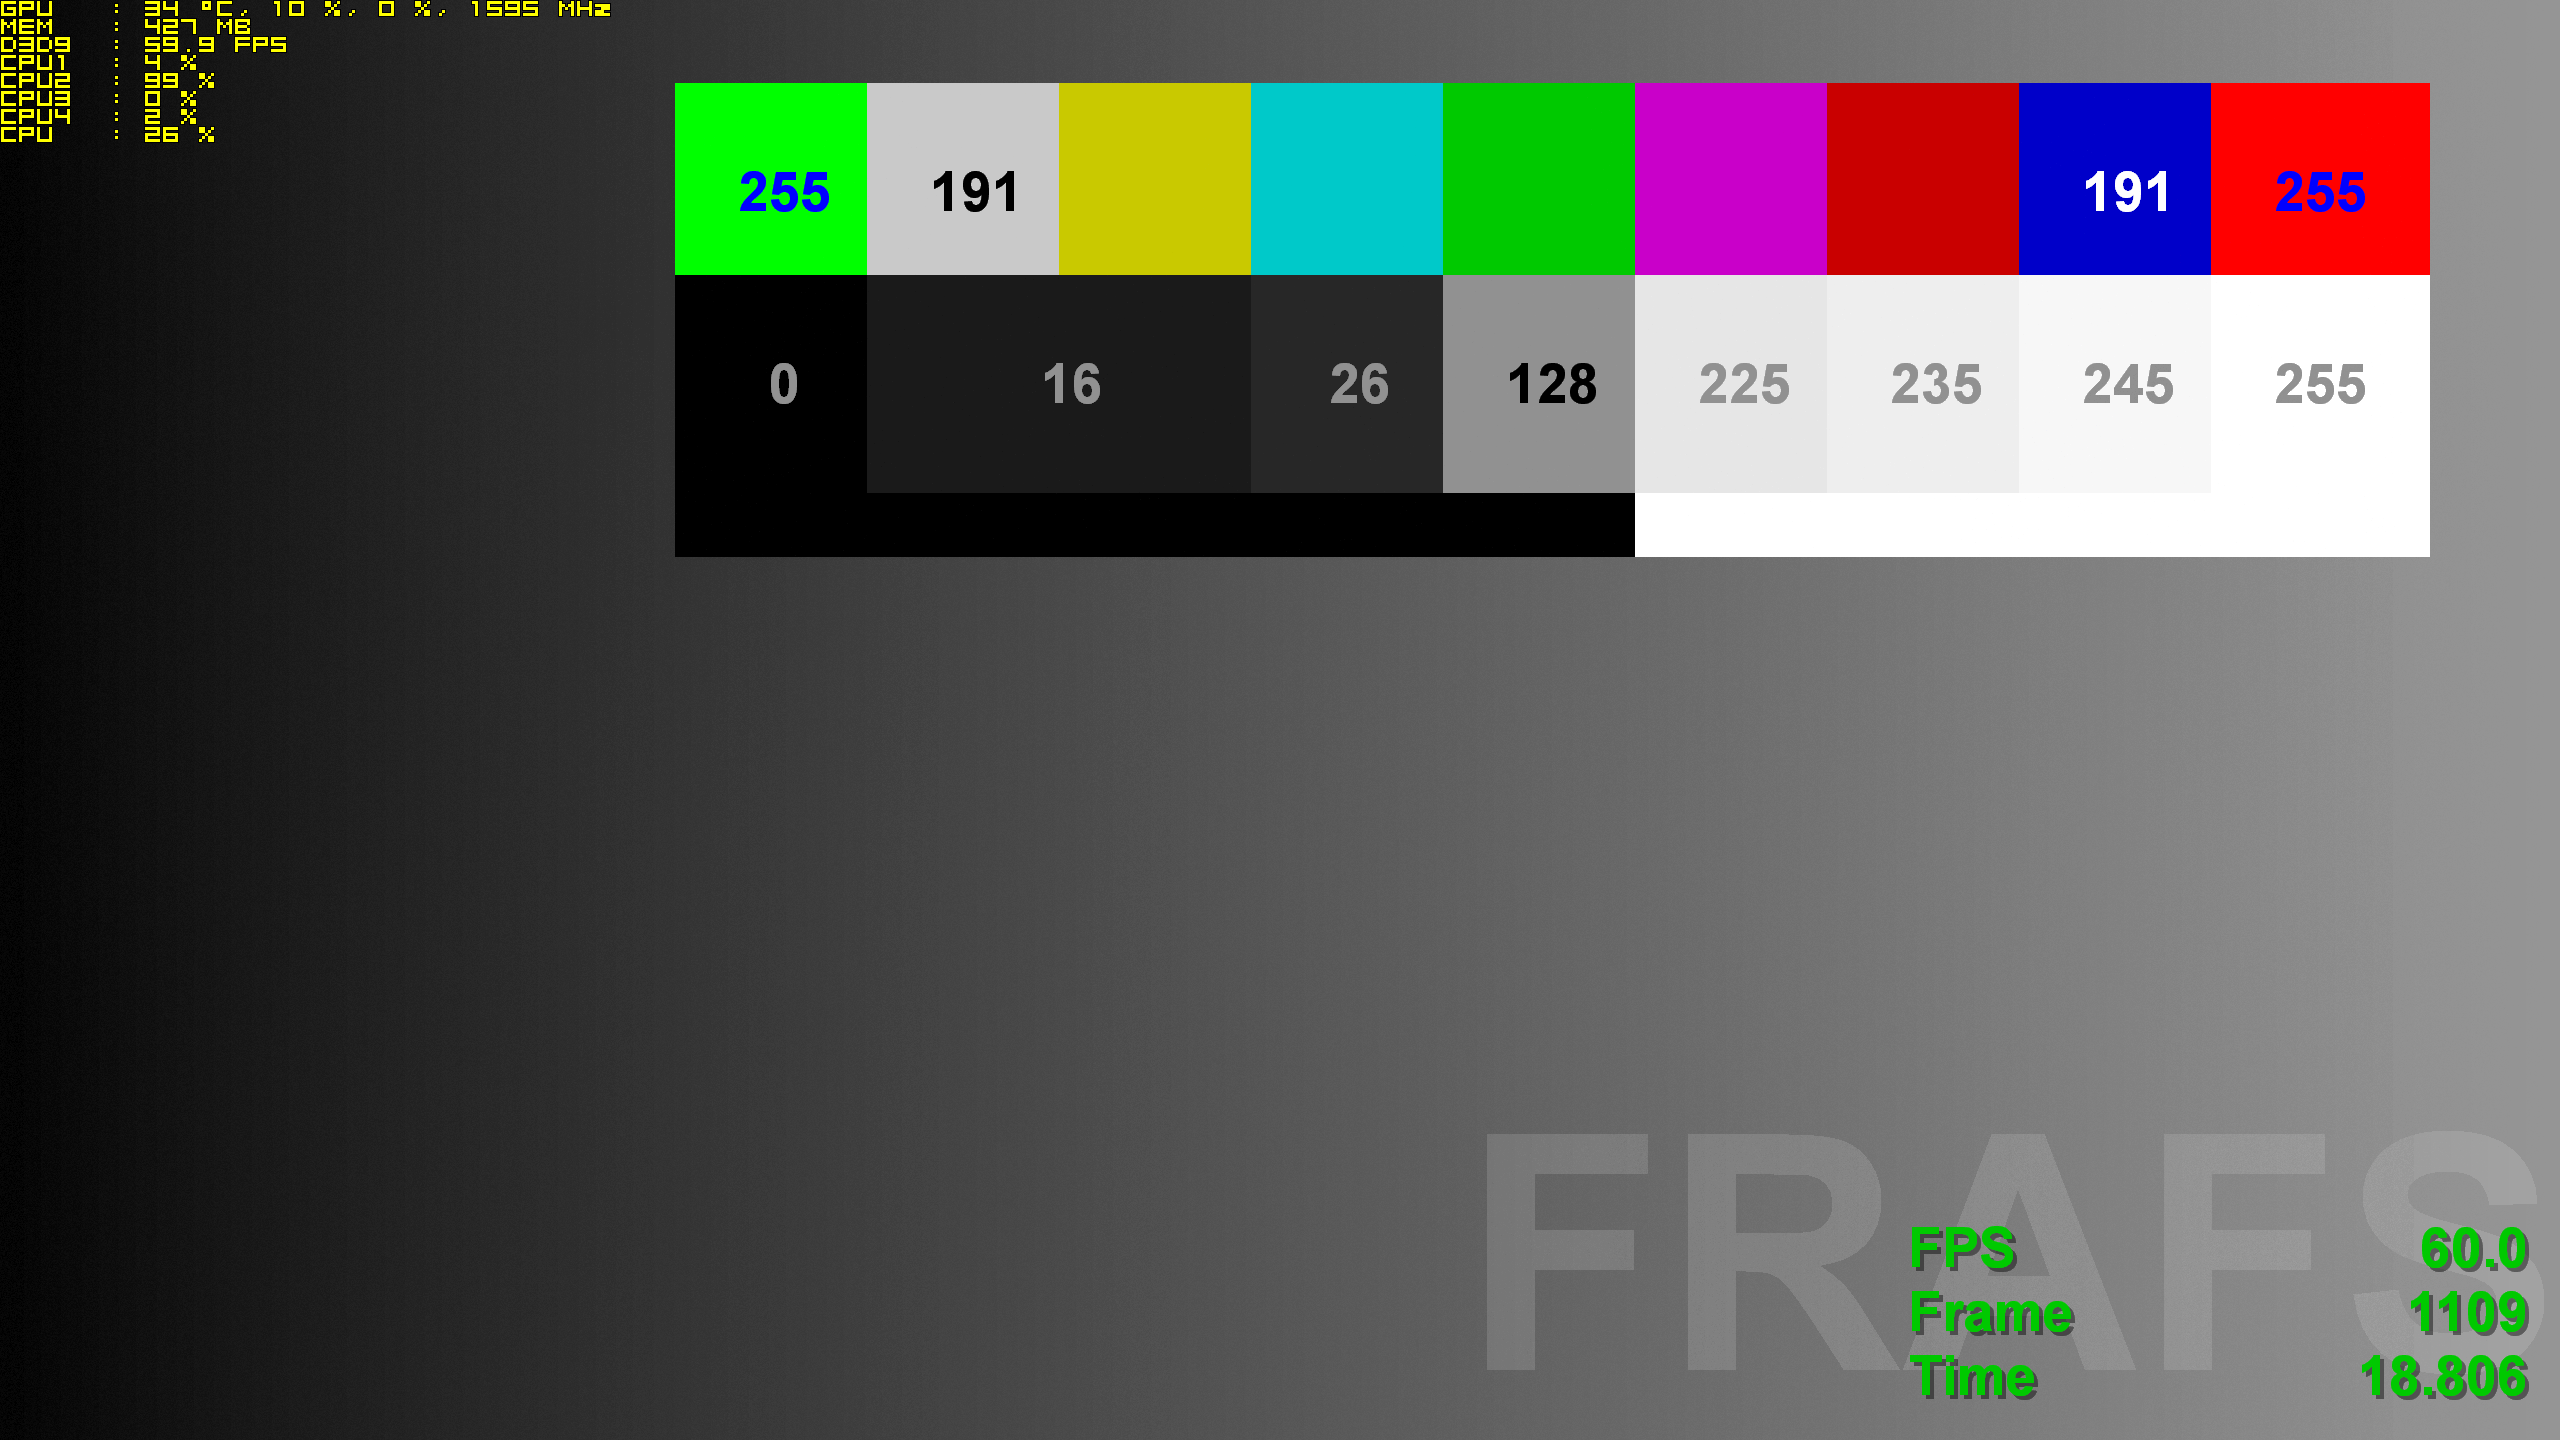
Here is a DX9 grey ramp test pattern you can use to check your banding with ReShade, just run ramp.bat.
https://www.mediafire.com/?nw37afqg6s52lrv
There is an interesting shader called Deband – CustomFX, but it doesn’t actually improve things in the right way. The dithering needs to be implemented differently, maybe if I can get my head around how AMD is doing it I might be able to implement it myself.
2016-09-11 at 16:53 #4042It may just be that Deband needs different threshold settings. The fact that it’s being applied before the 1D LUT in the pipeline order seems to be correct
-
This reply was modified 9 years, 10 months ago by Pneumatic.
2016-09-11 at 16:58 #4045Sadly the shader does not use dithering and there is lots of banding
The main problem with most game engines is the limited bitdepth processing.
It can be mitigated back to regular levels of banding by using the -p option with cctiff (generates the .tiff with extra precision).
Yes, that option should generally be used (I forgot).
The fact that it’s being applied before the 1D LUT in the pipeline order seems to be correct
Hmm, that seems backwards – it should be applied afterwards.
2016-09-11 at 17:15 #4047Here is a DX9 grey ramp test pattern you can use to check your banding with ReShade, just run ramp.bat.
Btw, the video card gamma table is active while using this fullscreen test program – make sure to reset it during testing.
2016-09-11 at 17:22 #4048With DEBAND_RADIUS 256 I am getting a very good result, almost like AMD quality dithering, but it eats about 10% GPU on a GTX1070.
2016-09-11 at 17:23 #4049Here is a DX9 grey ramp test pattern you can use to check your banding with ReShade, just run ramp.bat.
Btw, the video card gamma table is active while using this fullscreen test program – make sure to reset it during testing.
Yep I made a autohotkey script for that in the General forum!
2016-09-11 at 17:26 #4050Hmm, that seems backwards – it should be applied afterwards.
That’s what I thought at first, but if you remove colours first with the 8-bit LUT, then the algorithm has less colours to look at in its search radius.
If we take the full unaltered 256 shade ramp and dither that into a much higher depth , and THEN to those dithered pixel patterns start duplicating some of those pixels which are already in a dither pattern, the effect should be less.
-
This reply was modified 9 years, 10 months ago by Pneumatic.
2016-09-11 at 17:48 #4055To get really high quality smooth ramps I need to use settings which eat 20% GPU on my 1070 – maybe this is why Nvidia don’t offer it and AMD with its higher shader cores count can afford it.
2016-09-11 at 17:50 #4056These are the settings btw
//>Deband Settings<\\
#define DEBAND_RADIUS 256 //[0.0:1024.0] //-Sampling radius, higher values will reduce further banding but might also reduce details
#define DEBAND_THRESHOLD 0.017 //[0.000:0.100] //-Threshold, higher values will reduce further banding but might also reduce details and increase noise
#define DEBAND_SAMPLE_COUNT 8 //[1:8] //-Sample count, higher values are better
#define DEBAND_OFFSET_MODE 3 //[1:3] //-1 = cross (axis aligned, fast), 2 = diagonal (45 degrees, slower), 3 = box (fully random, much slower)
#define DEBAND_DITHERING 0 //[0:3] //-Additional dithering options to smoothen the output. 0 = No dithering 1 = Ordered dithering, 2 = Random dithering, 3 = Iestyn’s RGB dither (Valve)2016-09-11 at 18:07 #4058If we take the full unaltered 256 shade ramp and dither that into a much higher depth , and THEN to those dithered pixel patterns start duplicating some of those pixels which are already in a dither pattern, the effect should be less.
Alright, that makes sense.
2016-09-11 at 18:14 #4059To get really high quality smooth ramps I need to use settings which eat 20% GPU on my 1070 – maybe this is why Nvidia don’t offer it and AMD with its higher shader cores count can afford it.
I doubt the shader is as optimized as a hardware dithering implementation, so I suspect this would have a significant performance hit on AMD cards as well.
With DEBAND_RADIUS 256 I am getting a very good result
Hmm, DEBAND_RADIUS 256 on my GTX 1070 (connected over HDMI to a Philips TV) looks closer to no effect at all, and the default setting of 32 looks much smoother (but with DEBAND_DITHERING 1).
2016-09-12 at 5:04 #4062I think we must be using different versions because mine was set to 7 by default.
Also these are the settings I settled on which give a very smooth result and only 4% GPU usage.
//>Deband Settings<\\
#define DEBAND_RADIUS 256 //[0.0:1024.0] //-Sampling radius, higher values will reduce further banding but might also reduce details
#define DEBAND_THRESHOLD 0.033 //[0.000:0.100] //-Threshold, higher values will reduce further banding but might also reduce details and increase noise
#define DEBAND_SAMPLE_COUNT 2 //[1:8] //-Sample count, higher values are better
#define DEBAND_OFFSET_MODE 3 //[1:3] //-1 = cross (axis aligned, fast), 2 = diagonal (45 degrees, slower), 3 = box (fully random, much slower)
#define DEBAND_DITHERING 0 //[0:3] //-Additional dithering options to smoothen the output. 0 = No dithering 1 = Ordered dithering, 2 = Random dithering, 3 = Iestyn’s RGB dither (Valve)Remember to zero your 1D lut before viewing.

I notice there is an artefact down the right hand side of the image in the dithered one. It is to do with the DEBAND_SAMPLE_COUNT setting. But if I set it higher then I am back up at 20% GPU usage 🙁
Also the dithering pattern looks less noisy when actually running , because it randomises the pattern every frame.
-
AuthorPosts