Home › Forums › Help and Support › What settings for my level of "Black Crush?"
- This topic has 25 replies, 3 voices, and was last updated 8 years, 10 months ago by
 Darkmatter.
-
AuthorPosts
-
2017-08-26 at 20:27 #8592
I’m using a ROG PG279Q Monitor set to white LED and using a Spyder 5 Pro. Correction is set to None. On the calibration page I’m using interactive display adjustment and am able to get all the bars to the centre. I’m using CIE 1931 2deg for Observer, Whitepoint “As measured”, Ref “Daylight,” White Level “As Measured,” Black Level “As measured,” Tone Curve set to Gamma 2.2 Relative. Black output offset is set to 100% with an ambient light level of 5.7 lux. Black point correction is set to “Auto” and the Rate is set to 4. Calibration Speed is set to Medium using XYZ LUT + Matrix on “High” profile quality and the 175 patch test chart. I use the bigger chart when I set it to run before going to bed if I decide to do it at night.
I used this gif to test my black crush and I can’t see anything until about step 5. I did my own test in Photoshop using a working color space of my monitors profile and did ABCD etc starting at RGB 1. I can tell there’s a letter there at RGB 5 and can see it’s an E at RGB 6.
Should I make any adjustments to my settings for my more thorough test that I plan to run tonight?
Thanks for reading all that!
2017-08-27 at 12:12 #8593That sounds pretty usual to me. I’m now using an MVA panel – still worried about that. It has a massive contrast ratio and a low black point and i get the same result and have done on other monitors. For a test I feel this one is more realistic
https://www.drycreekphoto.com/Learn/Calibration/monitor_sensitivity.html
The other one is testing your eye’s sensitivity really.
On that one I’m inclined to see a reversal on 1-15 at the black end. In other words the brighter and darker patches are in the wrong order. This may be due to the gamma curve that has been obtained. It’s great apart from at the black end where the temperature rockets.
I’d also add that if I set a black point when processing for shadow detail I’d say it’s always over 5. Might be interesting to know what people with stupendous monitors set but could be that only they would see the detail.
I usually us black point correction too. I find it helps clean up the grey scale.
The reports can give you a good idea of how the grey scale is performing as well.
I haven’t used black offset and and have mixed feelings about using ambient light levels. That varies. Currently I’m at 122 cd/m^ and can see the change in the last bright square on the link I posted. I feel that is more important indicating that it’s not too bright for the monitor. Others may see neither end. In that case a balance is probably more important.
I’ve no idea what black offset does and that’s why I didn’t use it. It might boost the black output. Bearing in mind that others probably wont be using it and may well be using poorly set monitors anyway that didn’t seem like a good idea to me. Argyll etc is far more comprehensive than the software that usually comes with both colorimeters and spectrometers.
John
–
2017-08-27 at 12:33 #8594Just looked at a reply to me from Florian on the black offset aspect. Black can only be added to so the setting will reduce contrast ratio. I had the name of the black modifiers mixed up.
The monitor I am using at the moment is better at the black end than the previous one which couldn’t handle the last black patch in the link and wasn’t totally clear on the next one up. Looking at shots I did on that monitor I would say that I can’t see any difference on the new one i am using now. Contrast ratio on that one is circa 3,000:1. Previously it’s been well over 200 on other monitors which I suspect is the norm for IPS panels. Numbers such a 260+ ring bells on more recent ones. I’ve usually used Dell UltraSharps.
John
2017-08-27 at 14:36 #8597On the “split boxes” chart I can’t make out anything on the first column but can make out a slight change in the 2nd and/or 3rd row of the 2nd column. On the last (white) column I can just barely make out a change on row 4 and/or 5.
For the banding test I do get some banding but the test said that is normal for most monitors.
2017-08-27 at 18:22 #8601Ok I did a fast calibration with black offset set to 50% instead of 100% and the black crush seems to be slightly better, but not by much.
These are my Calibration Curves and…
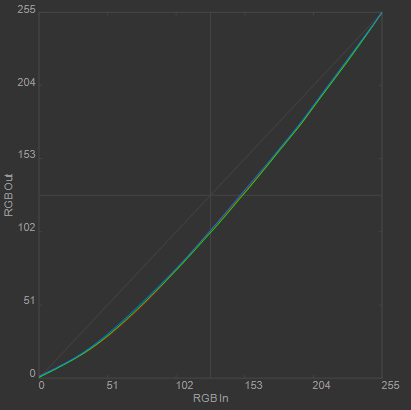
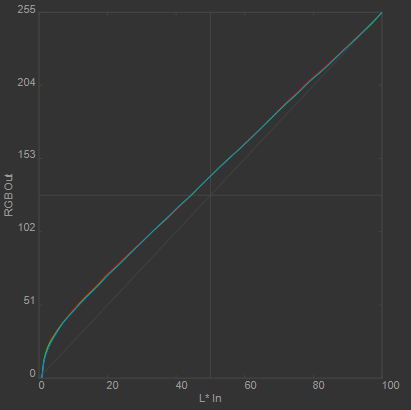
Does this look normal?
2017-08-27 at 21:13 #8604It wouldn’t surprise me if your monitor can’t make out the ends of the split squares especially at the black end.
I’m assuming that you haven’t used DisplayCal that often. I’d suggest that you start again and use DisplayCal defaults first. In other words select no options. Also no monitor options. The settings shown here in the calibration section should give a good starting point but as monitors vary they aren’t cast in stone.
http://www.tftcentral.co.uk/reviews/asus_rog_swift_pg279q.htm
I’ve attached the calibration default settings.
On this monitor looks like you do need to select an option Racing Mode. Usually it’s just a case of selecting custom colour. Monitors generally need to be at their default contrast setting – same as when it was supplied.
Initially set calibration as per the attachment
The first set up screen on DisplayCal is pretty important. The aim is to get close to the correct brightness, usually 120 cd/m^2 and as close as possible to the desired colour temperature. That’s more difficult since monitor started having 0-100 adjustments rather than 0-255 so aim for close to 6500K.
When adjusting the colour bars with the custom colour settings in the monitor a tick come up when the colour temperature de error that has been calculated is below some limit. There is no harm in trying to get it even lower. Adjusting the colour channels will usually also change the brightness so that may need changing periodically. They all inter react really so this stage can take some time. It also best to try and keep the colour channel adjustment numbers as high as possible which usually means at least one of them will be at or close to 100.
My monitor is currently at 6596K and 122.5 cd/m^2 and I used black point correction. I didn’t on the very first run I did. This is my 3rd. I enabled it because of low acceptable errors in the grey scale,. it’s smoothed it out. Most of them now have an error of well under 0.5, one 0.76 and one 1.5. Colour errors are much better. I’ll probably do another run without the correction to see if the 1.5 on the grey scale is improved. It might make others worse but providing they all produce double ticks using the extended verification chart I don’t care. I also include the values shown when the rdb button on the report is set to rgb+grey.
I might try another run with blue one point lower to see if I can get closer to 6500K too. There isn’t any point really but I probably will anyway.
I usually find it takes 4 or 5 runs to achieve the best a monitor can achieve but in real terms is already as good as it needs to be. DisplayGui / the reports will highlight anything that isn’t. I generally aim for a maximum de of 1 but the standards allow readings to be higher than that. My 1.5 is ok really it just bugs me that it’s at rgb 249,249,249.
All I am saying really is that people should look to get things as good as they need to be really and in real terms while many may go further there isn’t really any need. What’s ideally wanted is a smooth response and acceptable errors. A max de error of 1.5 is pretty low really providing there aren’t lots of them. My current average is 0.23 as a lot of the errors are really low.
John
–
-
This reply was modified 8 years, 11 months ago by
 ajohn.
Attachments:
You must be logged in to view attached files.2017-08-27 at 22:17 #8607Thanks for the info. I have a Spyder5Pro so I do use the ambient light level meter as part of my calibration. The one thing thats odd is that for the interactive part at the start the instructions say to get all the bars to the center, which I can do very easily, however my white point is around 8000+K.
2017-08-28 at 10:20 #8609You need to carry on adjusting the bars until you get close to 6500K. If you used the setting in the link on your monitor I posted from the calibration section I’d expect it to be a lot closer than 8000K.
High temperatures are usually associated with too much blue or low red but as things get closer any change and a rebalance of the channels and a correction of the brightness can have the desired effect.
I too can measure ambient light but don’t now having used it. I concluded it’s better to aim for 120 cd/m^2 as like most people’s my ambient light levels vary.
John
–
2017-08-30 at 0:09 #8620I was just following the on screen interactive display which said to make all the bars go to the center. Actually, not only is my white temp 8k my white level is 320 cd/m2, nowhere near 120, but the display looks good and doesn’t look overly bright.
I’m going to set the display to try to target 6500k and 120cd/m2 at gamma 2.2 and see what sort of calibration I get, but I think the screen will be way to dark. We’ll see. 🙂
2017-08-30 at 1:25 #8635I used this gif to test my black crush and I can’t see anything until about step 5.
RGB 5-5-5, assumed to be displayed on a monitor calibrated to gamma 2.2 without color management, has a relative luminance of 0.0175 (of 100), which is very low and is supposed to be hard to see (if at all), especially when flare/glare and the actual display black floor are taken into consideration. Also see the FAQ on why such tests are flawed.
2017-08-31 at 19:54 #8662Thanks Florian. Could you answer a couple more questions? In my above post, do my curves look right? I linked to the images. Also, is 300 cd/m2 far to high a brightness? I set it to “as mesured and got the bar to the center line. For my 120 cd/m2 was to dark for me and I’m now using 250cd/m2 at 6500k and gamma 2.2 which seems pretty good. The “curves look the same though and the color doesn’t look different despite being set to 6.5k and not 8k.
Thanks!!
2017-08-31 at 21:27 #8667In my above post, do my curves look right? I linked to the images. Also, is 300 cd/m2 far to high a brightness?
If brightness is too low or too high it can cause eye strain and fatigue, so you’re in the best position to judge that yourself with respect to your environment. Your ambient light level is far too low for such a high brightness though. I would generally highly recommend to disable ambient light level adjustment, because it won’t affect color managed content anyway.
2017-08-31 at 22:14 #8669I’m in a basement appartment with the blinds shut for privacy and 2 floor lamps that bounce warm light off the ceiling behind me and 1 more at the other end of the room and a tall floor lamp to the left of my computer. All put out a warm light, which I prefer to stark white light. That’s why my ambient is so low. But I’ll take your suggestion and do a calibration with it disabled.
I also want to say that your program is FAR superior to Spyder5’s software and I’ve enjoyed the learning curve of experimenting with different settings. Your input (and everyones) has also been a big help.
Thanks!
2017-09-01 at 0:07 #8677I just tried to run a calibration same as always but I’m getting an error at the start of the interactive part.
“Error – New_disprd() faild with ‘Instrument Access Failed’
Never had that error before.
2017-09-01 at 2:05 #8682Is your instrument connected (firmly attached to USB socket)? If you’re using MS Windows, is it visible in device manager and is it using the right driver? Any other software accessing the instrument?
-
This reply was modified 8 years, 11 months ago by
-
AuthorPosts